Bluetooth connection instructions
Step 1: Scan the QR code of Bluetooth APP below (Figure 1.1) to identify the QR code (left picture for IOS client, right picture for Android client) or open your mobile browser, search “xiaoxiang” and download the APP (Figure 1.2).

(Figure 1.1)

(Figure 1.2 )
Step 2: After successfully installing the Bluetooth app, open the app. After allowing the Bluetooth connection and obtaining the location information, the app will automatically open the account registration page (see Figure 1.3). Please enter the required mobile phone number, set the password, and confirm completion (Figure 1.4).
If you have forgotten the login password, you can use the email inbox to reset the password:
1). Open the login interface, find the forgotten password, and click it to enter the password reset interface;
2). Enter the linked email address and click Send Verification Code. The verification code will usually be received within 60 seconds. Please open your email inbox to verify.
3). Enter the confirmation code, set a new password, and click "Confirm." Figure 1.5

Figure 1.3

Figure 1.4

Figure 1.5
Step 3:
l). Connect Bluetooth: After successful login, the APP jumps to the Bluetooth list, select the Bluetooth to connect.
2). Change the battery: If there are multiple batteries, you can select multiple Bluetooth names in the list and quickly change the battery that needs to be connected in the real-time interface.
3). Scanning code connection: Click the "Scanning Code" button in the upper right corner of the real-time interface to establish a direct connection by scanning the barcode of the Bluetooth module.
4). Bluetooth Search: On the device list page, if you have multiple batteries, you can search by Bluetooth name to quickly find the battery you need to connect.
5). Disconnect Bluetooth: On the device list page, click "Disconnect." (Figure 1.6) (Figure 1.7).

Figure 1.6

Figure 1.7
Status display
1. Capacity information: In idle mode, only the SOC percentage and remaining battery capacity are displayed. When charging, the estimated full charge time is displayed; when discharging, the estimated discharge time is displayed. (Figure 1.8)
2. Switch and protection status: The current status of the charge and discharge switch is 0n. "ON" is displayed when the switch is on, and "OFF" is displayed when the switch is on. When the scale is activated, "ON" is displayed. When the scale is not activated, "OFF" is displayed. Protection status: When the protection board triggers the protection threshold or manually controls charging and discharging, the corresponding protection status is displayed. When the protection status is not triggered, "OFF" is displayed.
3. Battery information: The following data will be displayed on the APP: total voltage, current, power, maximum single voltage, minimum single voltage, average voltage, pressure difference and cycle number.
4. Temperature and humidity: Temperature 1 and MOS temperature are the ambient temperature of the protection board. The other is the external NTC temperature for detecting the battery cell temperature.
5. Single series voltage: Single series cell voltage, the protection board collects cell information, the highest voltage is displayed in green, the middle value is displayed in blue, and the lowest voltage is displayed in gray.

Figure 1.8
Control key
1. Charge and discharge switch: Through the APP can directly control the charge and discharge witch on or off, control the battery charge/discharge.
2. Automatic Rebalancing: Forced activation of the rebalancing function. When the function is successfully activated, the real-time rebalancing status will be displayed on the page.
3. Delete Alarms: Deletes the alarm data.
4. Reset capacity: Reestimate the remaining capacity based on the current voltage. (Figure 1.9).
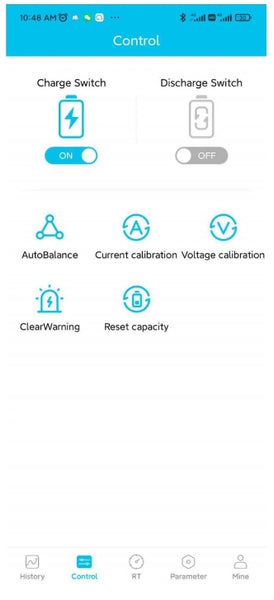
Figure 1.9
Parameter data
1. Click the History tab. Figure 1.10
2. Click the Parameters column and then click Basic Parameters, as shown in Figure 1.11
3. Click Basic Settings to display the following information: Nominal capacity, Cycle capacity, Full charge capacity, and Battery string number. Figure 1.12
4. Click Basic Information to view basic battery information. If necessary, you can enter the Bluetooth number in the field and click Settings to change the Bluetooth number. Figure 1.13

Figure 1.10

Figure 1.11

Figure 1.12

Figure 1.13
Device assignment
1. Connecting the device: When establishing a Bluetooth connection for the first time, the app will automatically display a dialog box asking you to click "0K" to connect the device; you can only change the parameters in the background with permission. Figure 1.14
2. Unbind the device: Go to the My Account screen, select the device you want to unbind, and click Unbind. An account can be bound to multiple devices, as shown in Figure 1.15 and Figure 1.16.

Figure 1.14

Figure 1.15

Figure 1.16